Recipe Review: 10-minute toddler-friendly pasta

I have a tendency to cook spice-heavy dishes. I love cumin, paprika, coriander, fennel seeds, caraway, turmeric, & fenugreek, to name a few, but it’s not for everybody.

In the region of France where I live, the craziest that people tend to get is a few dashes of nutmeg – people’s palates here are generally accustomed to much more salt, fat, & sugar (much like the standard American diet), and not to a lot of herbs and spices. I rarely have to tone it down for my partner, luckily, but if I’m cooking for his family, I have to be a little more conservative when it comes to the spice cupboard. I’ve found that the dishes my friends & family in the U.S. might consider to be “toddler-friendly” tend to go over better.

This particular recipe is an intersection – it’s friendly to the more subtle palate, and I happen to love it, too! It’s the second I’ve tried that uses a mix of hummus & tomato sauce very successfully. It was, for me, an unexpected match made in heaven. What is particularly nice about this recipe is that you can use whatever vegetables you have on hand as add-ins. They’re puréed and the flavor is masked by the stronger flavors of hummus and marinara, so little veggie-avoiders are none the wiser. If you’re making it for adults, well, most adults, you can leave the extra veggies whole. I like to add peas to the cooking pasta 2 minutes before it’s finished. It takes almost zero extra effort, and it’s both beautiful and tasty.

20170502_111826.jpg

I found the original recipe on Oh She Glows, one of my go-to sites for amazing vegan food. Many of the recipes I find there, I adapt by eliminating oils or reducing salt, but this one required no mucking about. The only thing I changed from the original was to exclude the hemp hearts – that’s not something I can get around here, and it’s not worth ordering online, for me. Visit the link above for lovely pictures and the original recipe. This is how I made it:

Ingredients
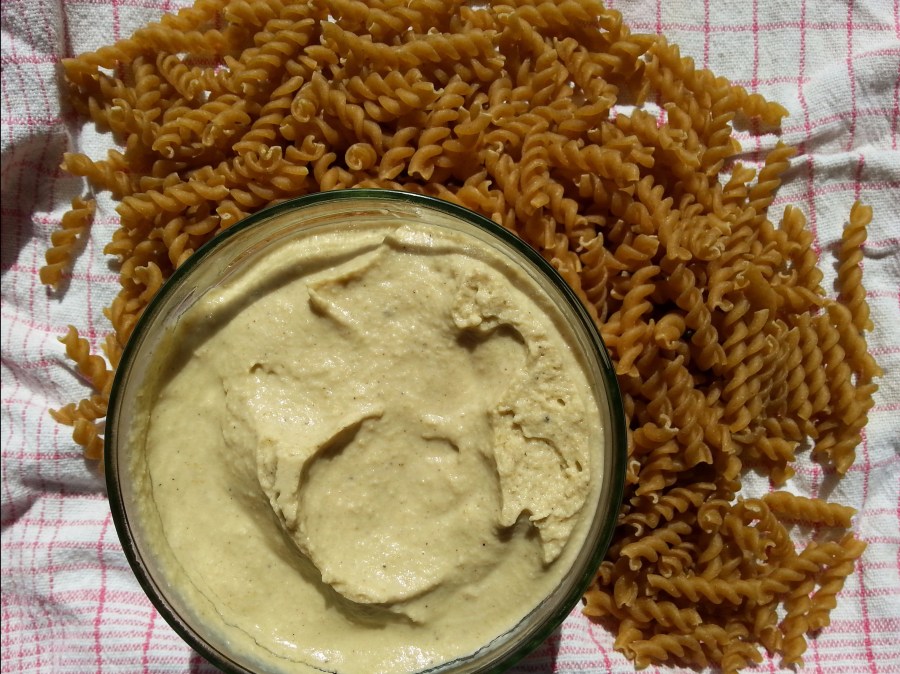
  • 6 c (715 g) cooked whole wheat pasta, which is 3 c (340 g) dry
  • 2 c (475 ml) marinara
  • 1/2 c (125 ml) hummus (store-bought tends to have a lot of oil, so follow the link for my oil-free hummus recipe)
  • 1 tsp garlic powder
  • 2 c (200+ g) chopped cauliflower or whatever other vegetable you want
Cooking Instructions

This one’s crazy fast & easy.

  1. Boil cauliflower for about 10 minutes, until softened, and drain. Remember, to get the most benefit from cauliflower, you can cut it 45 minutes before cooking it, or just mix a little bit of mustard powder into the finished dish.
  2. Combine marinara, hummus, cauliflower (or other vegetable), and garlic powder in a blender until thoroughly mixed.
  3. In a large pot, combine cooked pasta & sauce, and cook until heated through. You can skip this step if your pasta is hot off the stove, especially for younger kids – the hot pasta will warm up the sauce without making it too hot to eat right away.
Nutrition Information

This recipe is meant to feed 4 adults, so I used the appropriate amounts of pasta and cauliflower to fit in with the daily dozen. The information below is for 1 serving, or 1/4 of the above recipe, including the pasta.

10 minute pasta nutrition info
generated using cronometer.com

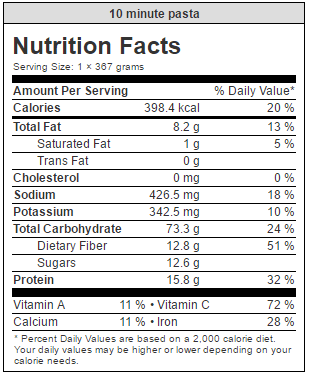
The high sodium content here is due in large part to the fact that I used a commercially produced marinara sauce to generate the nutrition facts. For a lower sodium content, make your own marinara or buy one that is low in sodium. My favorite thing about making my own marinara is that I can add as much tarragon as my heart desires. For me, that really makes the sauce. It’s the sole purpose for which I grow tarragon in my garden.

Hey, where is all that protein coming from? It’s not from that small amount of hummus. It’s actually mostly from the pasta! There’s a fair amount in the marinara sauce, too.

So, that got me thinking – I’ve heard people say loads of times that animal products provide us with so-called “complete” proteins, while vegan foods do not. I should look at the in-depth protein profile of whole wheat pasta versus a beefsteak! Here it is – can you tell which is which based on presence vs absence of any particular amino acids?

Incomplete protein
Generated to compare protein composition, assuming the same total amounts of protein, not the same amounts of food.  Made using cronometer.com

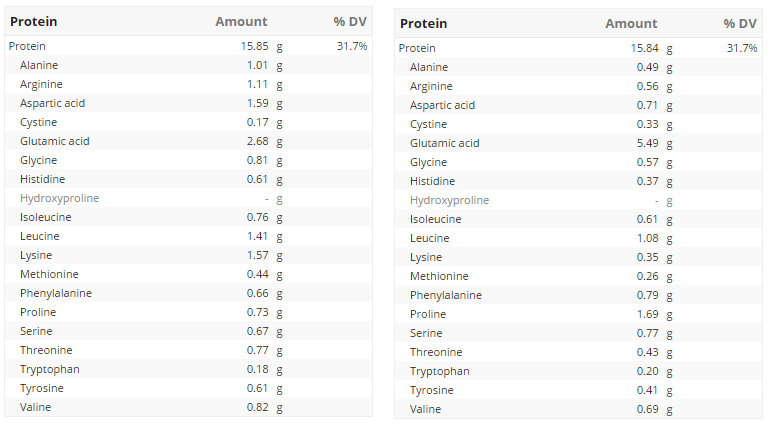
I’ll give you a hint – even though both contain higher amounts of glutamic acid than any other amino acid listed, it’s the highest in pasta. And that’s good news for vegans! Glutamic acid is essential for making glutamine, one of the most important amino acids. Glutamine is necessary in coping with stress and for recovery from illness and strenuous exercise. It even helps to reduce fat storage. Read more here about why scientists have referred to it as an “internal fountain of youth”.

Are any of the essential amino acids (the ones we must consume because we cannot synthesize them ourselves: isoleucine, leucine, lysine, methionine, phenylalanine, threonine, tryptophan and valine) missing from the pasta? No! They are not. So, let’s put all of this monkey-business about incomplete protein in vegan diets to rest, shall we?

Back to the recipe. So far, everyone who I’ve forced to eat this has liked it. And so do I! Plus it’s so cheap to make, and so fast & easy to put together, that I think it could easily become a staple for a lot of people who try it.

Checklist items: .5 beans, cruciferous, 1 other vegetables, spices, 3 whole grains (6.5 out of 18 servings)

For easy reference, here’s what you’ll need to round out the day:

  • 2.5 beans
  • berries
  • 3 other fruits
  • 2 greens
  • 1 other vegetables
  • flaxseeds
  • nuts


Advertisement

Recipe Review: The Best Damn Vegan Sour Cream

The Quintessential Vegan Cream.

This stuff is absolutely amazing. It takes me 5 minutes to make. I’ve used it to replace sour cream, crème fraîche, mayonnaise, and cooking cream in dishes as diverse as tarts, cole slaw, and burritos. You can even use it in sweets. It serves as a base to which you can add any other flavors you’d like. The best part? It’s a delicious way to get your daily serving of nuts.

20170405_103124.jpg

It is, as advertised, The Best Damn Vegan Sour Cream. I use the recipe exactly as described by Savanna at Gluten-Free Vegan Pantry. This is the first recipe review in which I don’t recommend any changes. I even find the amount of salt to be appropriate. I tried adding more nutritional yeast once because I love it, and it just wasn’t as good, so now I stick to the original.

The recipe is repeated below for one reason – to make some of your lives easier by giving the ingredient amounts in metric (not available in the original).

  • 1 c. (135 g) raw cashew nuts, soaked for 8 hours or overnight
  • 1/4 c. + 2 T (90 ml) lemon juice
  • 1 tsp nutritional yeast (you might omit this for use in certain sweet items)
  • 1/2 c. (118 ml) water
  • 1/4 tsp salt

Throw everything in the blender and you’re done. In the original recipe, it says to blend for 5 – 7 minutes, but I get impatient and only blend for 3 – 4 minutes. It comes out really nice and creamy for me, but that may depend on your blender. Use the link given above to see lovely pictures of the ingredients and finished product.

More dilute than nut butters because about half the contents by volume are nuts, you can use about 4 T or 1/4 c. (60 ml) of cashew cream for one serving of nuts. I like to think about it this way: if I eat 2 sweet potato & black bean burritos, that’s 2 T for each burrito.

Vegan cashew cream has definitely added flavor to my meals, made more dishes possible, and helps me tick a box off my daily dozen with very little effort. This one’s a winner.

See my Sour Cream recipe page for more ideas on how to use this recipe as a base for other things.

Recipe Review: Root vegetable tagine

I found the original recipe for Root Vegetable Tagine on Epicurious. It’s by a woman named Molly Stevens and, looking at her profile, I can see that it’s definitely one of those accidentally-vegan recipes. I’ve made it a few times now, and have perfected it to my  own taste. The original recipe totally didn’t work for me, but I saw the potential and I did find that with just a few small changes, the recipe got not only seriously yummy, but also healthier, cheaper and quicker to make than the original! Wins all around! Here it is as I made it (and many thanks to Molly Stevens for the inspiration):

20170111_140619.jpg

The Recipe
  • 1 tsp coriander seeds
  • 1 tsp cumin seeds
  • 1 tsp caraway seeds
  • 1 tsp turmeric
  • 1/2 c. lemon juice
  • 1 medium onion, diced
  • 3 cloves garlic, minced
  • 2 T tomato paste
  • 2 large carrots (I chopped the carrots, turnips, sweet potatoes and celery rather small in order to cook them quickly)
  • 3 small turnips
  • 1 large celery stalk or a chunk of celeriac, roughly apple-sized (I used the latter)
  • 2 medium sweet potatoes, well-washed, skin-ON
  • 1 c. garbanzo beans
  • 1 c. bulgur (dry)
  • 4 c. vegetable broth (preferably homemade) or increase to 6 c. if you wish to cook the bulgur in broth rather than water
  • 1/2 c. fresh parsley, chopped
  • 1/2 c. fresh cilantro, chopped
  • 1/2 c. fresh mint, chopped

The original recipe called for 3 T olive oil, 3/4 c. olives, 1/4 c. sun-dried tomatoes, 1/2 tsp of crushed red pepper, only 1/4 tsp turmeric, and a whopping 4 1/2 tsps of salt, all of which I omitted. The salt was supposed to go into making preserved lemons, which I also left out simply to save some time. The lemon juice, which was meant for the preserved lemons, I repurposed by adding it to the tagine directly.

I did use 1/4 tsp of salt. I only left out the red pepper flakes because the last two dinners I’ve made have been seriously spicy, and I just wasn’t in the mood for a third.

The first time that I made the recipe, I included the olives and the sun-dried tomatoes. I absolutely hated the olives in this dish, though I’m an olive lover in general. For me, they just didn’t fit. The second time I made it, I decided that I didn’t really enjoy the sun-dried tomatoes, either, even though I’m generally a HUGE fan of them. Losing both of these items significantly reduces the cost of making this dish, while also reducing the salt  & oil contents, making it healthier.

I used vegetable broth in place of the water called for in the original to add another level of nutrients.

I also used far more herbs than the original recipe, which only called for 2 T cilantro and 1 tsp dried mint. In my opinion, if you’ve got more salt than mint in your recipe, something is off! I wanted to make my bulgur a little more bright and tabbouleh-ish to balance out the richness of the root veg.

I used regular old garbanzos rather than the spice-roasted ones called for, simply to reduce the amount of time it would take to pull this recipe together.

Last but not least, I used bulgur, a whole grain, rather than couscous, which is essentially a  type of pasta made with semolina flour.

Cooking Instructions

I did several things differently, so rather than refer you to the original recipe for instructions, I’ll tell you exactly what I did.

  1. Toast the spice seeds in a pan on medium heat until they become quite fragrant, just 2 or 3 minutes, then grind them and mix in the turmeric and salt.
  2. In a large pan, sauté the onions in a little of the broth until translucent, then add the garlic, and cook for another 3 – 5 minutes.
  3. Add the spices, tomato paste, and 4 c. broth; stir until the tomato paste is fully incorporated into the broth.
  4. Add the vegetables and the garbanzo beans.
  5. Cook, covered and on medium heat, stirring occasionally, until all the vegetables are tender, about 35 minutes, depending on the size of the cut.
  6. In the meantime, prepare the bulgur as instructed on the box, using broth rather than water, if desired. Once it’s ready, stir and allow to cool a little.
  7. Add the fresh herbs to the bulgur and stir them in.
  8. Serve the vegetables on top of the bulgur.
Nutrition Information

This recipe will feed 3 people with a hearty appetite. The nutrition information below is for 1/3 of the recipe as made here, with one exception – I didn’t include the use of my homemade vegetable broth in place of water. Also, I assumed canned garbanzo beans. Using cooked-from-dry will lower sodium content.

Root veg tagine nutrition info
generated using cronometer.com


Checklist items: just under 1 beans, just under 1 cruciferous, .5 greens, 3 other vegetables, spices, 2 whole grains (about 8 out of 18 servings)

For easy reference, here’s what you’ll need to round out the day:

  • 2 beans
  • berries
  • 3 other fruits
  • 1.5 greens
  • flaxseeds
  • nuts
  •  1 whole grains

And now I’m really wishing I were having this for dinner tonight! I’ll definitely be making it again very soon.


Review: buckwheat

Why buckwheat?

I decided to give it a try after seeing it used in a recipe as a sort of salad garnish, like croutons, only not.

wp-1469095549384

When I finally found it (my region is not known for variety in its cuisine) I saw that I had 2 options – toasted or untoasted. Since the untoasted bag was about half the price of the toasted, I went for that one.

Nutrition info

Reading the label: per 100 g, dry.

corn vs wheat

In my review of corn pasta, I used cronometer to figure out the amount of dietary fiber, since it wasn’t listed on the package. In order to check to see how accurate cronometer may or may not be on that score, I entered buckwheat into cronometer, too. It says that 100 g of dry buckwheat contains 10.3 g fiber. So, obviously, it can vary and the numbers to the left are specific to the brand that I purchased.

Performance

wp-1469095778939The first thing I wanted to do with it was to try it like I’d seen in the recipe – sprinkled on salad. So, I toasted them in a pan on the stove over low-med heat for about 20 minutes, shaking the pan occasionally to make sure they’d toast evenly.

It smelled so good – like fresh-baked bread!! And they added the most wonderful crunch to the salad. I know umami is meant to apply to flavor, but if it can be applied to texture, then it perfectly describes what toasted buckwheat adds to a salad!

Next, I wanted to try it as a cooked grain, like rice, so I added 1 part buckwheat to 2 parts boiling water, turned the heat to low and let it cook for 30 minutes. I didn’t add any flavoring because I wanted to understand the taste of the buckwheat by itself before using it in other ways. It has a clean taste, a good foundation for any flavors you want to add to it. I think if I’d toasted the buckwheat before putting it in the water, it would perhaps have a slightly nutty flavor, but I’ll have to try it before I say for sure.

But what struck me, again, was the texture! Even cooked like rice, I still really love the texture of buckwheat!

When it was done, I added some cooked mushrooms and a little dressing, and ate some of it hot. Nice. Then I set it aside to taste it cold – I maybe liked it even better cold! I think this will be a really nice grain for tabbouleh-style cold salads.

If you haven’t tried buckwheat yet, I recommend you hop to it! It’s my new favorite thing.

Are you a fan of buckwheat? What’s your favorite way to eat it?

Review: corn pasta

Why corn pasta?wp-1469009419913.jpg

Variety! And because corn pasta is a nutritious whole-grain alternative to regular pasta, (suitable for people with Celiac’s). Usually, I go for whole wheat pasta because it’s the cheapest alternative where I live, but last weekend, I sprang for the corn stuff. Here’s how it turned out…

Nutrition info

Reading the labels: corn vs whole wheat, per 100 g, dry.

corn vs wheat

Did you notice that little asterisk * next to dietary fiber? That’s because I’m a little unsure about this one. Since the information for dietary fiber isn’t listed on the package, I entered it into cronometer. According to cronometer, corn pasta has a slight edge over whole wheat. However, my corn pasta is a mix of 80% corn and 20% rice – rice pasta being much lower in fiber content – so in my case, they’re probably about even. Of course, that’s all a big guess.

Performance

I thought that this bright yellow corn pasta would be pretty on the plate. In the end, the color cooked out of it, and it looked like a regular white pasta – that’s good news if you’re trying to get a skeptic to eat it – you can serve it to them and they’ll be none the wiser until you tell them, especially since it also tastes quite ‘normal’. It didn’t stand out as having a particularly corn flavor, and I found it to be roundly fulfilling, if slightly lighter than whole wheat pasta.

A note about cooking corn pasta

While it performed well in the pasta bowl, I was underwhelmed with the cooking process. With ‘regular’ pasta and whole wheat pasta alike, you have to stir it in the beginning to ensure it doesn’t stick to the bottom of the pan, but, once it gets rolling, you can leave it alone until it’s time to drain. Not so with corn pasta – the more it cooked, the more it wanted to stick to the bottom, so you have to stir it consistently during cooking.

It also created loads of foam. I suppose that’s neither here nor there, but it’s just one more reason why you have to keep stirring it while it’s cooking.

Overall, I like it but I won’t go out of my way to get it over the cheaper and easier-to-find (in my area, anyway) whole wheat pasta. For people who have to avoid wheat, it’s a perfectly reasonable substitution other than the hassle of constant stirring.

Have you had corn pasta? If so, what did you think?